提问于:
浏览数:
3203
tikz## 编译环境
操作系统
* [ x] Windows 7/8/10
* [ ] macOS
* [ ] Linux
`若需勾选,请把[ ]改成[x]`
Tex发行版
* [ x] TexLive `年份`
* [ ] MikTeX `版本号`
* [ ] CTeX
`若需勾选,请把[ ]改成[x]`
## 我的问题
图形是人民教育出版社,七年级数学上册课本,第71页习题的图。下面给了一个实现的方法。问:代码有改进的方案吗?即tikz绘图有循环方法吗?图形排列有简单的方法吗?
[](https://wenda.latexstudio.net/data/attach/200608/Ahs83M4d.png)
````
\documentclass[UTF8]{ctexart}
\usepackage{tikz}
\usetikzlibrary {calc}
\usepackage{graphicx}
\usepackage{caption,subcaption}
\begin{document}
%要用的的包:tikz、calc、graphicx、caption。
%\end{minipage}%之后的“%”不能少,与一个图形不能有空行。
\begin{figure}
\begin{minipage}[thtbp]{0.25\linewidth}
\centering
\begin{tikzpicture}
\def\x{1cm} %利用参数定义长度。
\def\r{0.8mm}
\coordinate (A) at (0,0);
\coordinate (B) at (\x,0);
\coordinate (C) at (60:\x);
\fill[red] (A) circle (\r);
\fill[red] (B) circle (\r);
\fill[red] (C) circle (\r);
\end{tikzpicture}
\subcaption*{$n=2$}
\end{minipage}%
\begin{minipage}[thtbp]{0.25\linewidth}
\centering
\begin{tikzpicture}
\def\x{1cm} %利用参数定义长度。
\def\r{0.8mm}
\coordinate (A) at (0,0);
\coordinate (B) at (\x,0);
\coordinate (C) at (60:\x);
\fill[red] (A) circle (\r);
\fill[red] (B) circle (\r);
\fill[red] (C) circle (\r);
\fill[red] ($ (A)!.5!(B) $) circle (\r);
\fill[red] ($ (B)!.5!(C) $) circle (\r);
\fill[red] ($ (C)!.5!(A) $) circle (\r);
\end{tikzpicture}
\subcaption*{$n=3$}
\end{minipage}%
\begin{minipage}[thtbp]{0.25\linewidth}
\centering
\begin{tikzpicture}
\def\x{1cm} %利用参数定义长度。
\def\r{0.8mm}
\coordinate (A) at (0,0);
\coordinate (B) at (\x,0);
\coordinate (C) at (60:\x);
\fill[red] (A) circle (\r);
\fill[red] (B) circle (\r);
\fill[red] (C) circle (\r);
\fill[red] ($ (A)!0.333!(B) $) circle (\r);
\fill[red] ($ (A)!0.666!(B) $) circle (\r);
\fill[red] ($ (B)!0.333!(C) $) circle (\r);
\fill[red] ($ (B)!0.666!(C) $) circle (\r);
\fill[red] ($ (C)!0.333!(A) $) circle (\r);
\fill[red] ($ (C)!0.666!(A) $) circle (\r);
\end{tikzpicture}
\subcaption*{$n=4$}
\end{minipage}%
\begin{minipage}[thtbp]{0.25\linewidth}
\centering
\begin{tikzpicture}
\def\x{1.3cm} %利用参数定义长度。
\def\r{0.9mm}
\coordinate (A) at (0,0);
\coordinate (B) at (\x,0);
\coordinate (C) at (60:\x);
\fill[red] (A) circle (\r);
\fill[red] (B) circle (\r);
\fill[red] (C) circle (\r);
\fill[red] ($(A)!0.25!(B)$) circle (\r);
\fill[red] ($(B)!0.25!(C)$) circle (\r);
\fill[red] ($(C)!0.25!(A)$) circle (\r);
\fill[red] ($(A)!0.5!(B)$) circle (\r);
\fill[red] ($(B)!0.5!(C)$) circle (\r);
\fill[red] ($(C)!0.5!(A)$) circle (\r);
\fill[red] ($(A)!0.75!(B)$) circle (\r);
\fill[red] ($(B)!0.75!(C)$) circle (\r);
\fill[red] ($(C)!0.75!(A)$) circle (\r);
\end{tikzpicture}
\subcaption*{$n=5$}
\end{minipage}%
\caption*{(第10题)}
\end{figure}
\end{document}
````
3 回答
0
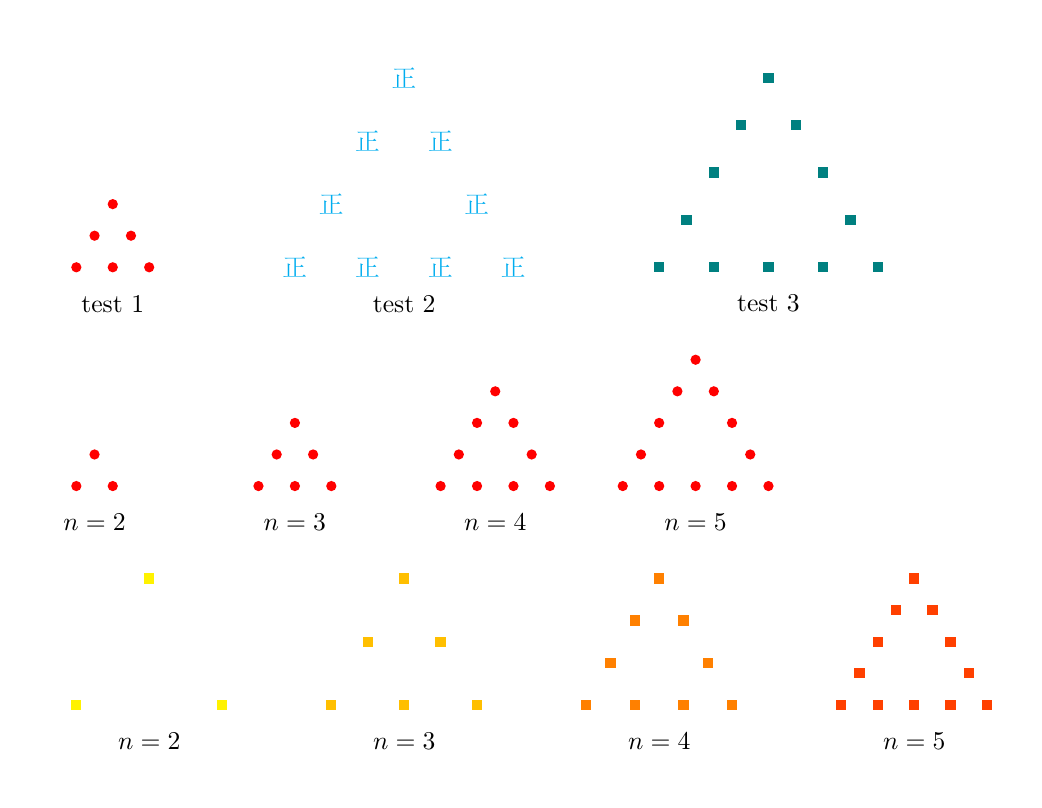
画图并不难,有多种方式,麻烦的是高度可定制的样式,这里提供了如何使用`pgfkey`管理样式的例子供参考,简单实现了对三角形以下样式的定制:
- 每条边上点的数量
- 相邻点之间的间距
- 边的宽度(会自动计算间距)
- 每个重复点的样式
- 三角形下方的文本
更多的样式可以参照着设置。
```tex
\documentclass[tikz, border=1cm]{standalone}
\usepackage{xeCJK}
\usetikzlibrary{calc}
\makeatletter
\newlength\triangle@@sep
\tikzset{
triangle count/.store in=\triangle@count,
triangle count=2,
triangle sep/.store in=\triangle@sep,
triangle sep=5mm,
triangle width/.store in=\triangle@width,
triangle width=,
triangle pattern/.store in=\triangle@pattern,
triangle pattern = {\fill[red] (0, 0) circle (2pt);},
triangle text/.store in=\triangle@text,
triangle text=,
pics/triangle/.style={
/tikz/transform shape,
code = {
\pgfmathsetmacro{\triangle@count}{\triangle@count - 1}
\ifx\triangle@width\pgfutil@empty
\pgfmathsetlength{\triangle@@sep}{\triangle@sep}
\else
\pgfmathsetlength{\triangle@@sep}{\triangle@width/\triangle@count}
\typeout{xyz \the\triangle@@sep}
\fi
\coordinate (triangle@shift) at (0, 0);
\pgfmathsetmacro{\triangle@total}{3 * \triangle@count}
\begin{scope}[local bounding box=triangle]
\foreach \x [
evaluate=\x as \triangle@ang using {120 * floor((\x - 1) / \triangle@count)}
] in {1, ..., \triangle@total} {
\coordinate (triangle@shift) at ($(triangle@shift) + (\triangle@ang:\triangle@@sep)$);
\begin{scope}[shift={(triangle@shift)}]
\triangle@pattern
\end{scope}
}
\end{scope}
\ifx\triangle@text\pgfutil@empty
\else
\path (0, 0 -| triangle.north) ++(0, -5mm) node {\triangle@text};
\fi
}
}
}
\makeatother
\begin{document}
\begin{tikzpicture}
\pic at (0, 0) [triangle count=3, triangle text={test 1}] {triangle};
\pic at (3, 0) [triangle count=4, triangle width=3cm, triangle text={test 2},
triangle pattern={
\node[cyan] at (0, 0) {正};
}
] {triangle};
\pic at (8, 0) [triangle count=5, triangle width=3cm, triangle text={test 3},
triangle pattern={
\fill[teal] (-2pt, -2pt) rectangle (2pt, 2pt);
}
] {triangle};
\foreach \x in {2, ..., 5} {
\pic at ({(\x - 2)*2.5}, -3) [triangle count=\x, triangle text={$n=\x$}] {triangle};
}
\foreach \x [evaluate=\x as \c using 100*(\x-2)/4] in {2, ..., 5} {
\pic at ({(\x - 2)*3.5}, -6) [
triangle count=\x,
triangle text={$n=\x$},
triangle width=2cm,
triangle pattern={
\fill[red!\c!yellow] (-2pt, -2pt) rectangle (2pt, 2pt);
}
] {triangle};
\end{tikzpicture}
\end{document}
```

-
非常感谢! – 海波 2020-12-13 20:35 回复
-
这个方法更有通用性,定制说明及实现非常好。学习tikz的进阶操作。多谢指点了。 – 海波 2020-06-09 09:56 回复
-
这个就太强了! – registor 2020-06-09 09:20 回复
0
可以使用`\foreach`循环实现:
```tex
\documentclass{ctexart}
\usepackage{tikz}
\usetikzlibrary{positioning}
\usepackage{graphicx}
\def\x{2} %利用参数定义长度。
\def\r{0.8mm}
\newcommand\tikzTri[1][1]{
% 起始点
\fill[red] (0, 0) circle (\r);
% 顶点坐标,主要是为了题注定位
\coordinate (C) at (60:\x);
% 单位长度
\pgfmathsetmacro\dx{\x / #1}
% 循环绘制3个边
\foreach \tx/\rt in {0/0,0/60,\x/120}
{
\begin{scope}[shift={(\tx,0)},rotate=\rt]
\foreach \i in {1,...,#1}
{
\pgfmathsetmacro\offx{\dx * \i}
\fill[red] (\offx, 0) circle (\r);
}
\end{scope}
}
% 标记数加1,并变为整数
\pgfmathtruncatemacro{\lb}{#1+1}
% 绘制题注
\node[below =\x of C] {$n=\lb$};
}
\begin{document}
\begin{figure}
\begin{tikzpicture}
\foreach \j in {1,...,4}
{
% 平移距离
\pgfmathsetmacro\offx{(\x + 1.5) * \j}
\begin{scope}[shift={(\offx, 0)}]
\tikzTri[\j]
\end{scope}
}
\end{tikzpicture}
\caption{(第10题)}
\end{figure}
\end{document}
```
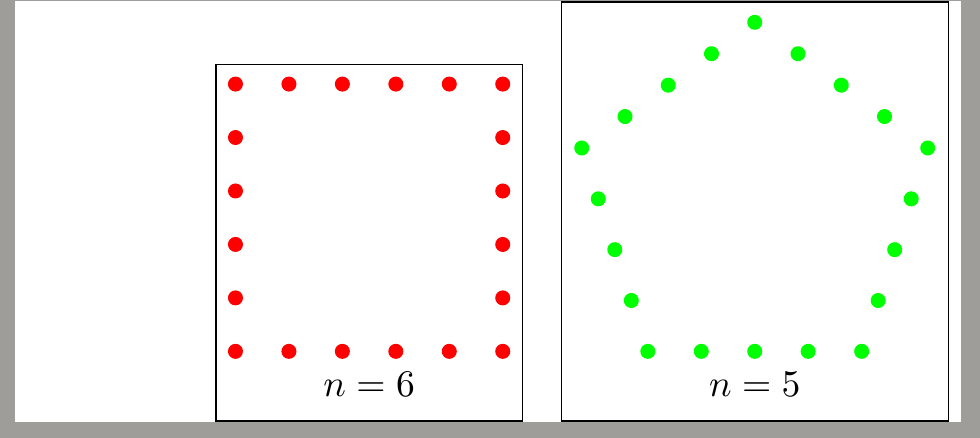
既然是欧几里德几何,建议你学习一下用texdoc tkz-euclide学习一下tkz-euclide宏包,可能还可以解决你其它的一些问题。用该宏包,可以实现这个图形:
```tex
\documentclass[12pt, border = 8pt, varwidth, convert]{standalone}
% 平面几何绘图宏包
\usepackage{tkz-euclide}
\def\x{1} %利用参数定义长度
% 设置点样式
% \tkzSetUpPoint[⟨local options⟩]
% shape possible: circle, cross, cross out
% size the size of the point is size * line width
% color
% fill circle
\tkzSetUpPoint[shape=circle, size=2, color=red, fill=red!50]
\newcommand\tikzTri[1][1]{
% 定义等边三角形
\tkzDefPoint(0, 0){A}
\tkzDefPoint(\x, 0){B}
\tkzDefTriangle[equilateral](A,B)
\tkzGetPoint{C}
% 绘制三角形顶点
\tkzDrawPoints(A, B, C)
% 循环绘制三个边的等分点
\foreach \pta/\ptb in {A/B, B/C, A/C}
{
% 计算边长
\tkzCalcLength(\pta,\ptb)\tkzGetLength{ABl}
% 循环绘制等分点
\foreach \i in {1,...,#1}
{
% 计算点的位置比例
\pgfmathsetmacro\myl{((\ABl/#1)/\ABl)*\i}
% 按比例定义线上的点
\tkzDefPointOnLine[pos=\myl](\pta,\ptb)
\tkzGetPoint{D}
% 绘制点
\tkzDrawPoint(D)
}
}
% 底边中点
\tkzDefMidPoint(A,B)
\tkzGetPoint{M}
% 标记数加1,并变为整数
\pgfmathtruncatemacro{\lb}{#1 + 1}
% 绘制题注
\node[below =0.2 of M] {$n=\lb$};
}
\begin{document} %在document环境中撰写文档
\begin{tikzpicture}
\tkzInit[ymax=5,xmax=5]
\foreach \j in {1,...,4}
{
% 平移距离
\pgfmathsetmacro\offx{(\x + 1.5) * \j}
\begin{scope}[shift={(\offx, 0)}]
\tikzTri[\j]
\end{scope}
}
\end{tikzpicture}
\end{document}
```
敬请批评指正。
0
参考前面网友的回答,我找到了一个比较“中文友好”的方法,下面的代码看上去可能有点不太习惯,将就一下吧!
texlive2020, texstudio, ubuntu, 我这里能正常编译下面的代码:
```
\documentclass{standalone}
\usepackage{xcolor}
\usepackage{tikz}
\usetikzlibrary[calc]
\usepgfmodule{parser}
\usepackage{pgfplotstable}
\begin{document}
%保存几个名称
\def\空命令{}
\def\点半径名{点半径}
\def\点间距名{点间距}
\def\点颜色名{点颜色}
\def\一边上点的个数名{一边上点的个数}
\def\边数名{边数}
\def\指定边长名{指定边长}
\def\临时保存{}
%设置初始值
\def\点半径{2}%2pt
\def\点间距{}%
\def\点颜色{red}
\def\一边上点的个数{}
\def\边数{3}
\def\边长{}
%定义操作命令
\def\分析#1:#2\定界标志{%
\def\临时变量{#1}%
\ifx\临时变量\点半径名%
\pgfmathsetmacro{\点半径}{#2}%
\else%
\ifx\临时变量\点间距名%
\pgfmathsetmacro{\点间距}{#2}%
\else%
\ifx\临时变量\一边上点的个数名%
\pgfmathsetmacro{\一边上点的个数}{int(#2)}%
\else%
\ifx\临时变量\边数名%
\pgfmathsetmacro{\边数}{int(#2)}%
\else%
\ifx\临时变量\点颜色名%
\edef\点颜色{#2}%
\else%
\ifx\临时变量\指定边长名%
\pgfmathsetmacro{\边长}{#2}%
\else%
\pgferror{检查输入!}%
\fi%
\fi%
\fi%
\fi%
\fi%
\fi%
}%
\def\最终操作{%
\ifx\一边上点的个数\空命令%
\pgferror{“一边上点的个数”未知,请给出!}%
\fi%
\ifx\边长\空命令%
\ifx\点间距\空命令%
\pgferror{“边长、点间距”未知,无法计算,请检查!}%
\else%
\pgfmathsetmacro{\边长}{(\一边上点的个数-1)*\点间距}%
\fi%
\else%
\ifx\点间距\空命令%
\pgfmathsetmacro{\点间距}{\边长/(\一边上点的个数-1)}%
\else%
\pgfmathsetmacro{\临时点间距}{\边长/(\一边上点的个数-1)}%
\pgfmathequal{\点间距}{\临时点间距}%
\ifnum\pgfmathresult=0\relax%
\pgferror{你输入的边长、点间距、一边上点的个数不协调,请检查!}%
\fi%
\fi%
\fi%
\pgfmathsetmacro{\边长之半}{0.5*\边长}%
\pgfmathsetmacro{\圆心角}{360/\边数}%
\pgfmathsetmacro{\圆心角之半}{0.5*\圆心角}%
\pgfmathsetmacro{\底角}{90-\圆心角之半}%
\pgfmathsetmacro{\外接圆半径}{\边长之半/cos(\底角)}%
\def\保存的绘制命令{}%
\pgfplotsforeachungrouped \i in {0,...,\一边上点的个数-2}%
{%
\edef\临时保存的绘制命令{%
\noexpand\fill($(-90-\圆心角之半:\外接圆半径 pt)+(\i*\点间距 pt,0)$)circle[radius=\点半径 pt];%
}%
\expandafter\expandafter\expandafter\def\expandafter\expandafter\expandafter\保存的绘制命令\expandafter\expandafter\expandafter{\expandafter\保存的绘制命令\临时保存的绘制命令}%
}%
\begin{tikzpicture}
\pgfplotsforeachungrouped \j in {0,...,\边数-1}%
{%
\pgfmathsetmacro{\旋转角度}{\j*\圆心角}%
\begin{scope}[rotate=-\旋转角度,fill=\点颜色]%
\保存的绘制命令
\end{scope}%
}%
\node [below]at(current bounding box.south){$n=\一边上点的个数$};%
\end{tikzpicture}%
}%
\pgfparserdef{我的点图}{initial};{%
\expandafter\分析\临时保存\定界标志%
\def\临时保存{}}%
\pgfparserdefunknown{我的点图}{initial}{%
\edef\临时保存{\临时保存\pgfparserletter}}
\pgfparserdef{我的点图}{initial}。{\pgfparserswitch{final}}%
\pgfparserdeffinal{我的点图}{\最终操作}
\pgfparserset{silent=true}
{
\fbox{\pgfparserparse{我的点图}点半径:2pt;点间距:5mm;边数:4;点颜色:red;一边上点的个数:6;。}
}
{
\fbox{\pgfparserparse{我的点图}点颜色:green;一边上点的个数:5;点间距:5mm;边数:5;。}
}
\end{document}
```
你的回答
请登录后回答
你的回答将会帮助更多人,请务必认真回答问题。