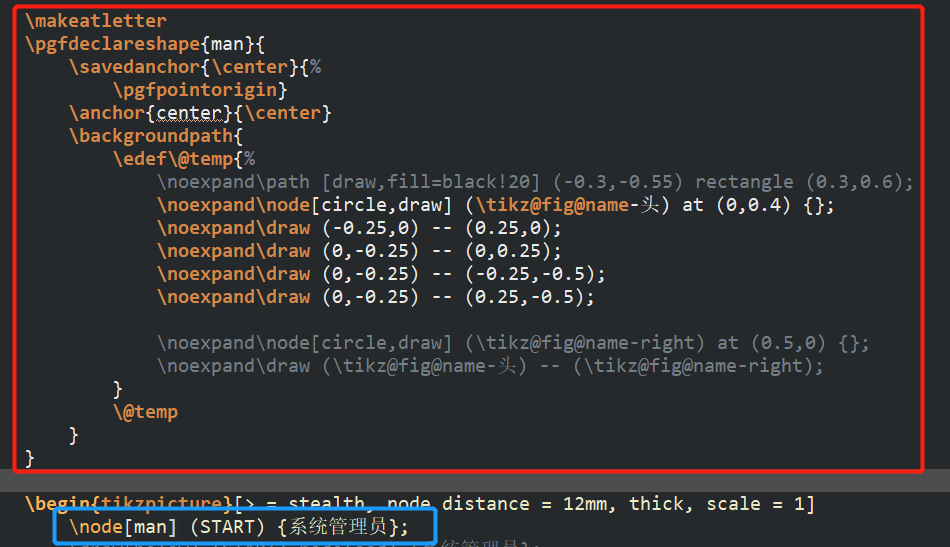
如下图1所示
红框是man结点的定义,蓝框是man结点的调用
输出如下图2(请忽视人裆下的小棍,是其他代码产生的)

问题:

  1. 我想让“系统管理员”的字居中显示在小人的脚下。或者说,我想让man结点无论输入什么文字都能居中显示在小人脚下。要怎么修改man的定义呢?
  2. 我还想让这个man结点在后期添加线段的时候不会总是从原点(0,0)开始连接,而是像上图2裆下的小棍那样,离小人有较大的距离(距离大得足以将中文放进去),如下图3所示。
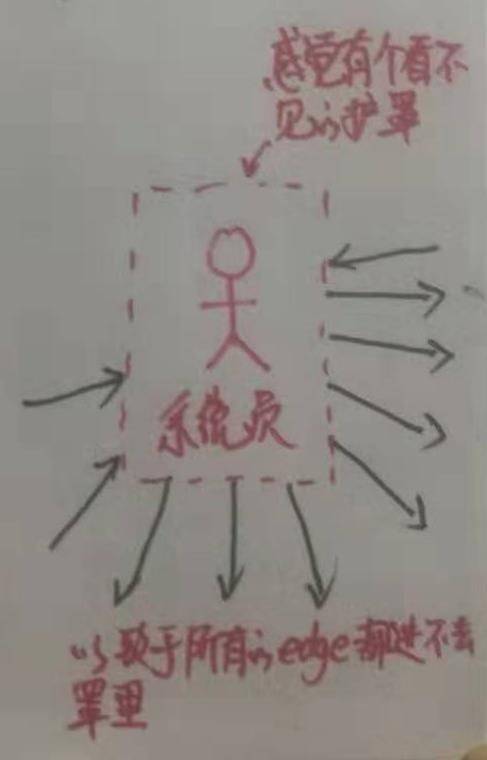
代码如下:(略有删改,输出与截图有所出入,但不影响本问题的提出)

\documentclass{article}
\usepackage{xeCJK}
\usepackage{amsmath, amssymb, graphics, setspace,palatino}
\usepackage{tikz,bm,color,tikz-3dplot,pst-3dplot,pgfplots}
\usepackage[margin=0cm,nohead]{geometry}
\usepackage[active,tightpage]{preview}
\usetikzlibrary{calc}
\usetikzlibrary{shapes,arrows}
\usetikzlibrary{spy}

\PreviewEnvironment{tikzpicture}

\begin{document}
  \makeatletter
  \pgfdeclareshape{man}{
    \savedanchor{\center}{%
      \pgfpointorigin}
    \anchor{center}{\center}
    \backgroundpath{
      \edef\@temp{%
        \noexpand\node[circle,draw] (\tikz@fig@name-头) at (0,0.4) {};
        \noexpand\draw (-0.25,0) -- (0.25,0);
        \noexpand\draw (0,-0.25) -- (0,0.25);
        \noexpand\draw (0,-0.25) -- (-0.25,-0.5);
        \noexpand\draw (0,-0.25) -- (0.25,-0.5);
      }
      \@temp
    }
  }

  \begin{tikzpicture}[> = stealth, node distance = 12mm, thick, scale = 1]
    \node[man] (START) {系统管理员};
  \end{tikzpicture}
\end{document}

3 回答3

1
试试 `pic` ```tex \documentclass{article} \usepackage{tikz} \usetikzlibrary{fit} % ref: https://tex.stackexchange.com/a/241737/79060 \tikzset{ man/.pic={ code={ \node[circle,draw, outer sep=0pt] at (0,0.4) {}; \draw (-0.25,0) -- (0.25,0); \draw (0,-0.25) -- (0,0.25); \draw (0,-0.25) -- (-0.25,-0.5); \draw (0,-0.25) -- (0.25,-0.5); \node[align=center, anchor=north, inner sep=0pt] at (0, -0.6) {\tikzpictext}; } } } \begin{document} \begin{tikzpicture}[scale=2] \pic[pic text=Manager \\ X, local bounding box=man a] at (0, 0) {man}; \pic[pic text=Manager \\ Y, local bounding box=man b] at (3, 0) {man}; \node[fit=(man b)] (man b1) {}; \foreach \i in {0,15,...,345}{ \draw [red, ->] (\i:1)++(man a.center) -- (man a); \draw [red, ->] (\i:1)++(man b1.center) -- (man b1); } \end{tikzpicture} \end{document} ``` ![](https://pics.latexstudio.net/data/images/201911/25c0d7527b2ee13.png) ------ 典型的 node shape,是 1. 先绘制 shape,确定 `\pgfnodeparttextbox` 2. 然后基于盒子的尺寸,计算得到所有 node anchor 的相对坐标 3. 其中 node text 的文字基线最左侧的坐标位置,是由 `\anchor{text}{...}` 指定的(默认为 center,也就是你例子截图里的情况)。 而你的需求里,最终 node 的大小要能根据 node text 的内容变化而变化的。这需要 node 的嵌套,只定义一层是不够的。既然已经要嵌套了,`pic` 容易得多。 参考文档:`texdoc tikz` 相关章节 1. node 相关,sec. 17 (详细语法), 106.5(如何自定义 node shape) 1. pic 相关,sec. 18(从章节编号大小也能看出,定义新 shape 比使用和定义 pic,底层多了) 如果你提供的例子是自己写的,应该已经看过 node 相关的文档了。
  • 非常感谢您清早起来的认真! – zhaochongbin 2019-11-12 22:24 回复
1
前面的网友已经回答了你的第一个问题,你的第二个问题可以参考命令`\anchorborder`, 这个命令的详细解释还请参考手册吧。你也可以看看文件 *pgfmoduleshapes.code.tex* 中对形状 **rectangle** 的定义,其中就用了命令`\anchorborder`. 我觉得使用 `\node [text width=3cm,align=center]{\includegraphics{图片}\\系统管理员};` 或者 `\node{\parbox{3cm}{\includegraphics{图片}}};` 也可能达到类似的效果。插入的图片可以是很个性的,例如带黑帽子,墨镜,叼着雪茄的人物图片,哈哈。 如果单纯用 pgf/TikZ 画这种图的话,确实是个考验。
0
正如上一楼所说,自定义 shape 要了解一些更为底层的东西,这种基础的不怎么需要使用特殊锚点(进行标注,对齐等)的图形,使用 pics 就好,这里我给了自定义 shape 的 mwe: ```tex \documentclass[tikz, border=1cm]{standalone} \usepackage{xeCJK} \setCJKmainfont{simkai.ttf} \makeatletter \pgfdeclareshape{man}{ \inheritsavedanchors[from=rectangle] % this is nearly a rectangle \inheritanchorborder[from=rectangle] \inheritanchor[from=rectangle]{center} \backgroundpath{ % get north anchor \pgf@process{\southwest} \pgf@xa=.5\pgf@x \pgf@process{\northeast} \pgf@x=.5\pgf@x \advance\pgf@x by \pgf@xa \pgf@xa=\pgf@x \pgf@ya=\pgf@y \pgfmathsetlength\pgf@xb{\pgf@xa-0.25cm} \pgfmathsetlength\pgf@xc{\pgf@xa+0.25cm} \pgfmathsetlength\pgf@yb{\pgf@ya+0.25cm} \pgfmathsetlength\pgf@yc{\pgf@yb+0.25cm} \pgfpathmoveto{\pgfqpoint{\pgf@xb}{\pgf@ya}} \pgfpathlineto{\pgfqpoint{\pgf@xa}{\pgf@yb}} \pgfpathlineto{\pgfqpoint{\pgf@xc}{\pgf@ya}} \pgfpathmoveto{\pgfqpoint{\pgf@xa}{\pgf@yb}} \pgfpathlineto{ \pgfpointadd{\pgfqpoint{\pgf@xa}{\pgf@yb}} {\pgfqpoint{0cm}{.5cm}} } \pgfpathmoveto{\pgfqpoint{\pgf@xb}{\pgf@yc}} \pgfpathlineto{\pgfqpoint{\pgf@xc}{\pgf@yc}} \pgfpathcircle{\pgfpointadd {\pgfqpoint{\pgf@xa}{\pgf@yc}} {\pgfqpoint{0cm}{0.45cm}} }{0.2cm} } } \makeatother \begin{document} \begin{tikzpicture} \node[man, draw] {系统管理员}; \end{tikzpicture} \end{document} ``` ![](https://pics.latexstudio.net/data/images/201911/fa27176dd6f31e4.png) 看了下你复制的内容,很明显自定义 shape 的方式不适合你,即使用了别人的代码,出了问题你也不知道在哪儿,反之 pics 容易上手的多

你的回答

请登录后回答

你的回答将会帮助更多人,请务必认真回答问题。